Everyone wants their website and brand to appear on page one – ideally top 3, of Google search result – the biggest search engines in the world right now. This not only brings massive traffic to your website but also raises awareness and enhances your brand image.
For your website to rank and appear higher on search engine results, you should publish plenty of unique and high-quality contents. High-quality content will usually get more shares and backlinks from authority websites, which in return contributes to your website’s ranking on Google and other search engines. Content is king. And content marketing is still one of, if not the most effective marketing strategy online.
You’ve spent a lot of time creating quality content. So, why would you want to restrict access to your articles and certain areas of your WordPress site?
Why Protect Your Website Content
Improve SEO & SERP Ranking
Websites with unique and high-quality content will typically earn a higher domain and page authority in the same niche as they grow larger and more links are pointed towards it. Copy-and-paste-content websites won’t be able to get a similar page or domain authority due to their spammy links.
However, if you’ve started out a new blog and websites with higher ranking duplicates your content without giving any credit, there is a possibility of the larger websites getting the SEO juice from the same content.
Writing great content can take days and weeks. Some research and investigative writings can take many months and years, it’s devastating to see other people using Ctrl + A (select all text), Ctrl + C (copying all contents) and Ctrl + V (pasting all contents to their websites). It’s better safe than sorry when it comes to ranking higher for your well-written content on the internet.
Stop Content Theft
There is important and confidential information that’s only meant for certain users as well as premium products that only paid customers should be able to download. It’s certain that you don’t want unauthorized users to access these kinds of content.
In this article, we will go through 7 ways you can apply to protect your WordPress content effectively.
- Disable copy & paste
- Password protect your website
- Use a membership plugin
- Lock part of the content
- Create shared private Links
- Block IP addresses
- Start a takedown
1. Disable Right Click
Almost all users know how to steal content online, that is to say, Google with the right keywords, find the particular piece of content, right mouse click, and select copy.
Disabling right click is probably the easiest solution when it comes to WordPress content protection. This simple action makes it much harder for average users to copy or download your images.
This method also helps prevent users with technical knowledge from viewing your page source codes and possibly exploit your website coding vulnerabilities and loopholes.
How to Disable Right Click
You can install a WordPress plugin and let it does the job for you.
- Download and install WP Content Copy Protection & No Right Click on your blog’s “Plugins” admin screen.
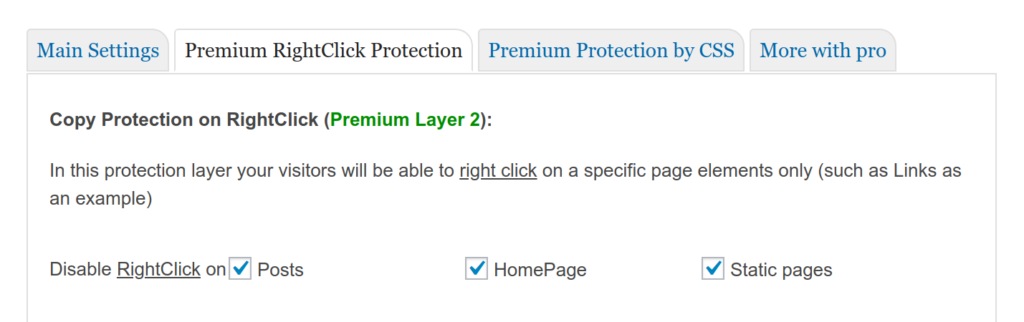
- Go to Settings, WP Content Copy Protection
- Switch on Premium Right Click Protection tab where you can select which custom post types to protect. Don’t forget to save the changes.
In case you have some basic understanding about coding, you can disable “right click” with a few simple lines of jQuery codes:
 $(function() {
    $(this).bind("contextmenu", function(e) {
       e.preventDefault();
    });
 });
Pros
- Easiest to implement
- Help stop people from “inspecting elements” and downloading your images and videos albeit not so effective
Cons
- Reduce the user experience: when right-click is disabled, it removes most features provided by browser extensions that many people may rely upon
- Users may not be able to share your content
- The least secure protection method
2. Password Protect Your Content
Password protection offers a more secure way to protect your WordPress content. Simply put, you lock out private content with a password. Only those with the correct password will be able to access the content.
You can protect certain private pages while leaving the rest of your site accessible to the public. In case you want to set up a completely private website, you may want to password protect your entire website.
On the minus side, it’s difficult to manage passwords for all your protected pages. Also, there is no easy way to share the password with multiple people without the risk of having it shared with unwanted users.
How to Password Protect your content
By default, WordPress enables you to password protect your content by editing your “Content Visibility”. If you’d like to password protect the entire site or by user roles, Password Protect WordPress plugin proves useful.
- Download and install WordPress Password Protect Page Plugin from WordPress.org
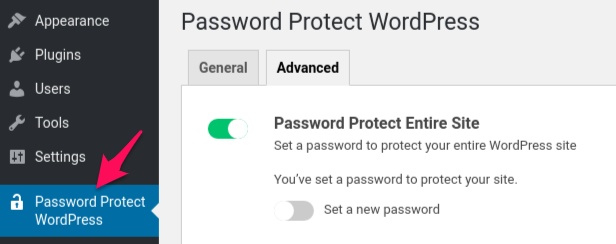
- While editing a page or post, you will see “Password Protect WordPress” section on the right hand. Simply enter a password to protect your content.
- In case you want to protect the whole site, go to plugin’s Settings Page and enable “Password Protect Entire Site” option under Advanced tab.
Pros
- Offer decent protection for your content
- Users don’t have to create a new account and “log in”
- Suitable for general content such as teaching materials or documentation
Cons
- Users need to remember “another” password
- Passwords can be easily shared with unauthorized users
- Difficult to manage passwords
3. Use a Membership Plugin
Together with password protection, using a membership plugin is one of the two most popular and effective methods to protect your content. Essentially, you put all your premium content, services, and digital products behind an authentication gate or log in. In other words, users need to sign in to view private content.
Membership level
By using a membership plugin, you actually turn your WordPress into a membership site where you can set up different membership levels. Both non-logged-in and authenticated users without the right permissions will not be able to access premium content behind authentication. For example, “Standard” customers might be able to see certain pages only, while those “Elite” level, all of your premium content.
You can use a membership plugin to protect your premium content whether you’re selling digital products, information as a service or online courses.
Although membership sites provide a powerful way to protect your content, it is complicated to set up and usually ideally for large websites – those with huge content and users.
How to use a membership plugin
- Download and install Paid Membership Pro on “Plugins” page.
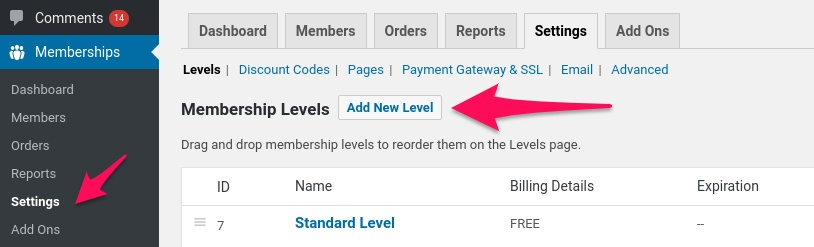
- On the dashboard, go to Memberships and switch to Settings tab to create a Membership level.
- You also need to set up some pages for your membership site, such as Levels page, where customers select and register a memberships account.
Pros:
- The most secure and comprehensive method to protect your content
- You can create multiple membership roles and levels with ease
- Scalable; easy to integrate with other email marketing software and platforms
Cons
- Complicated to set up especially for non-tech savvy people
- Users need to sign up and log in
Please note that most membership plugins don’t protect file attachments on your private content. You’ll need to install Prevent Direct Access Gold plugin to block search indexing and direct access to these WordPress files.
4. Lock part of the content
Content lock is a common method used by many bloggers and reputable online news publishers such as Financial Times and New York Times. Instead of protecting all your articles as in membership and password protection, you block part of your high-value content only.
The main difference between content lock and membership protection is you actually allow your audience to read a portion of your premium content, i.e. the title and probably a first few sentences or paragraphs of the article.
By showing the title and lede, you can let your users experience the value of your quality content. This is a good practice which generates more curiosity and usually results in higher email signups and opt-in conversions than totally blocked-content pages.
Alternatively, you can allow your readers to read a limited premium articles for free, then ask them to subscribe or pay to read more.
Unlike membership protection, content lock comes in useful when you start out a blog or build up content for your membership site. It protects, and at the same time, allows your content to be indexed and appear on Google search results, and so, accessible to your potential leads and buyers. That’s why Google provides its users with the so-called Flexible Sampling which functions more or less similar to content lock.
How to protect part of your content
You can use a lead generation or password protection plugin to protect part of your article’s content.
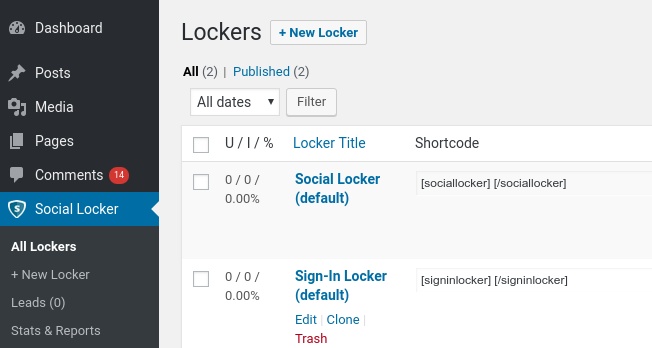
- Download and install OnePress Social Locker from WordPress.org
- On admin dashboard, go to Social Locker and select a locker (by copying its shortcode) or create a new one.
- Simply use the shortcode, for example, [sociallocker] your content [/sociallocker] in Edit Page to protect your valuable content.
5. Use Shared Private Links
Shared private links provide another interesting way to protect and share your content. The idea is to shield your content from being accessed directly as well as indexed by search engines, e.g. Bing and Google. Instead of using the original page URL, you create a custom private link probably with time or click restriction, and then share this link with certain people.
With shared private links, others don’t need to have an account and log in to your website in order to access confidential documents, which is convenient for most users.
Customizable access permission, together with a click and/or time restriction, make these shared private links a quick, simple and secure way to share your important content with others. The top storage services such as Google and Dropbox also have their own versions of private links.
How to create shared private links for your content
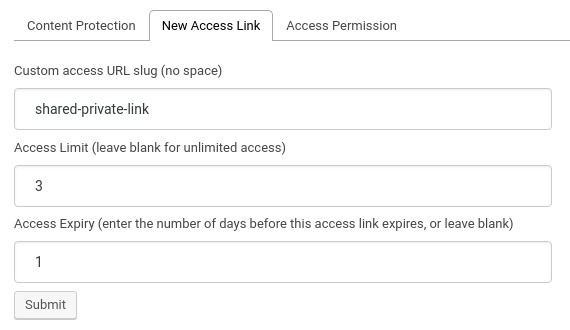
- Download and install Protect WordPress Pages & Posts plugin
- Under “Pages” or “Posts”, select “Configure protection” of a page which you want to protect and simply click “Protect this page”.
- In order to create shared private links, you can choose “Auto-generate new link” and “Customize new link”. Remember to set access limit and access expiry of these links to keep them from being abused.
Pros
- Useful if you want to share your content with other people who don’t have an account on your website
- Flexible; you can create as many private links as you’d like to
- Best suitable for email marketing
Cons
- Need to set a time or usage limit on those links
- You have to share the private links manually unless using with an Email Marketing software
6. Block IP addresses
Imagine you’re running an online store that only sells to customers from some specific countries. It’s likely that you want to open doors for visitors from these countries while blocking the rest from entering your store. Blocking traffic based on geography, aka geo-blocking, will come in handy.
What’s more, site scrapers, bots, spammers and unwanted visitors constantly hitting your website could leave adverse impacts on your server bandwidth and user experience. In this case, you may want to block these bad users from accessing your website content as well.
IP address blocking could also be used to protect your website and content against brute force and DDoS attacks as well as prevent fraud purchases.
How to block a specific IP address from accessing your website
You can block bad bots and unauthorized users by IP address or countries using .htaccess file or a WordPress plugin.
Using htaccess
# Allow all access except those stated below
Order Deny,Allow
Deny from 12.34.11.1
deny from .*example\.com.*

# Deny everyone access except those specified below
order deny,allow
deny from all
allow from 123.23.24.5
allow from .*example\.com.*
Using a plugin
If you’re running a WooCommerce store, chances are you want to block your customers from sharing their order page as well as product files after purchase.
- Get and install this WooCommerce Integration extension
- Enter the maximum IP addresses which are allowed to get access to the order page and product files after purchases
Pros
- Useful to block bots and spammers or when you run a private website
- You can also block traffic from certain countries
- Stop people from sharing WooCommerce order page after purchase
Cons
- Under DDoS attacks, manual IP address blocking alone is usually not enough
- Dynamic allocation of IP addresses requires blocks of IP address ranges, and so, causing collateral damage
7. Start a takedown
This is the last resort when your digital files and written content are already copied, used, and distributed without permission. Basically, you request Google and other search engines to remove unauthorized copies of your content on the Internet in order to comply with the Digital Millennium Copyright Act.
Copyright Removal Tools
DMCA.com provides a takedown system which can find your copied content and remove it quickly. The takedown process starts once your copyrighted content is found elsewhere. Pre-Takedown research is carried out to confirm the case.
Google also enables you to remove any links to your copyrighted materials from its index and search results.
Pros
- Identify infringing websites within 3 minutes
- Remove the copied content fast
- DIY Takedown is available for webmasters and website owners
Cons
- Users have to pay for DMCA.com services
- Your content is already copied and shared without permission. So this is considered the last resort.
Wrapping up
Creating great content takes a lot of time and efforts. So, it is essential to protect and put keep your away from content thefts. While each of the 7 methods mentioned above has its own pros and cons, they all help you reduce the risk of leaking important information and files. You can choose and implement the best suitable methods for your circumstances.
So, do you have any questions on how to protect your WordPress content? Let us know in the comments section below.


Thanks for the information!!!
Awesome information sir thanks for sharing this information
Thank you for sharing this Infos! I decided to disable the right click via plugin – but by testing it on mobile devices (ipad, iphone) i still can add images from my wordpress site to my photo mediathek :-/ does right click definitely mean only the right click of a mouse?
This has really been helpful.I have been struggling to protect my content from scrappers for quite sometime now
Thanks for sharing this Elena. Please do you know how I can check if my content has been copied? Or how do I find out if someone else is using my content on his/her own site?
Thank you Elena for this information but I have a question. does Disabling right-click or locking content can affect the search engine crawl?
This has really been helpful
Best information for me nice post
Really Helpful Article
Super helpful, but i didn’t understand where to insert
"$(function() {
$(this).bind("contextmenu", function(e) {
e.preventDefault();
});
});
"
because i don’t have a business account and i can’t go with plugins since they can be installed only through a business accountm, so i guess changing the code in order to disable a right click is the best option i have.
Hello Lorenzo, I assume you’re hosting on wordpress dot com because you’re mentioning a business account? In that case I’m afraid you don’t have options regarding insertion of the code. When it comes to OceanWP theme, there is an option to insert custom JS and jQuery without the use of third-party plugins. In your situation, perhaps checking out different hosting providers would be a better and more affordable solution, especially since you won’t be having so many restrictions like not being able to use a theme or a plugin you want
You can add CSS code into your theme and no need for any plugin.
* {
-webkit-touch-callout: none; /* iOS Safari */
-webkit-user-select: none; /* Safari */
-khtml-user-select: none; /* Konqueror HTML */
-moz-user-select: none; /* Old versions of Firefox */
-ms-user-select: none; /* Internet Explorer/Edge */
user-select: none; /* Non-prefixed version, currently supported by Chrome, Opera and Firefox */
}
Thanks for information, I was facing content copyright issue now with DMCA, I fixed content copyright issue
Thank you so much for this piece of information. It is so annoying to spend so much time writing an article and have someone else copy it.
This has really been helpful Thank You Elena Taylor
Safeguarding your WordPress content is paramount in an era of digital threats